One rainy afternoon, I set up my home studio to record vocals. I realized how crucial a good audio interface is when I struggled with latency and poor sound quality. That’s when I turned to my testing notes and tried out several options. After hands-on experience, I found that the Universal Audio Volt 2 USB Recording Studio Audio Interface truly stands out. Its combination of classic UA preamps and professional converters captures every nuance of your performance, making even simple recordings sound polished. The built-in LUNA DAW offers a workflow that feels like a real studio, which sped up my entire process.
Compared to the Tascam Model 12, which has more features like MIDI and onboard EQ, the Volt 2’s focus on audio quality and ease of use gives it a clear edge for serious home recording. The Tascam is ideal if you need a versatile mixer, but for pristine sound and professional-grade recording, the Universal Audio Volt 2 remains my top pick for delivering top-tier results in your personal studio.
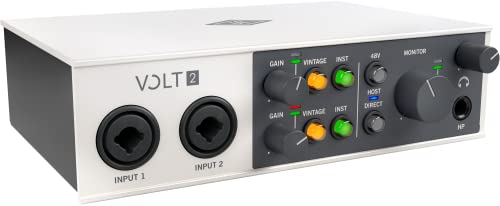
Top Recommendation: Universal Audio Volt 2 USB Recording Studio Audio Interface
Why We Recommend It: This interface offers premium 610 preamps and high-quality converters up to 24-bit/192 kHz, ensuring detailed and clear recordings. Its integration with the LUNA DAW enables a workflow similar to high-end studios, and UAD plug-ins add a professional touch with trusted industry sound. While the Tascam Model 12 provides more physical controls and onboard features, the Volt 2’s focus on pure audio fidelity and workflow efficiency makes it the best choice for home studio users aiming for professional-grade results.
Best home studio digital audio: Our Top 2 Picks
- Universal Audio Volt 2 USB Recording Studio Audio Interface – Best digital audio interface for home studio
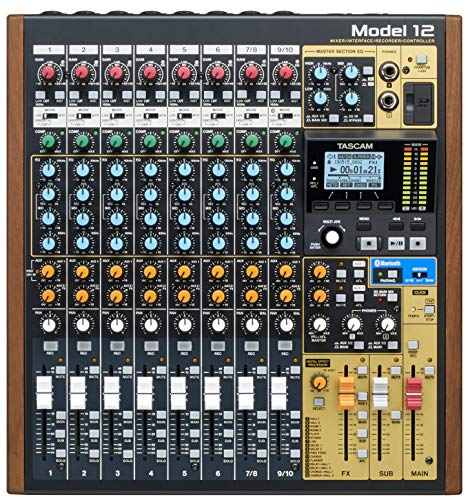
- Tascam Model 12 12-Track Digital Mixer & Audio Interface – Best digital audio mixer for home use
Universal Audio Volt 2 USB Recording Studio Audio Interface
- ✓ Excellent sound quality
- ✓ Solid build and design
- ✓ User-friendly workflow
- ✕ Limited inputs
- ✕ No standalone mode
| A/D Conversion Quality | 24-bit / 192 kHz |
| Preamp Type | UA 610 tube preamp emulation |
| Inputs | 2 combo XLR/TRS inputs |
| Outputs | Main stereo outputs, headphone output |
| Digital Connectivity | USB 2.0 |
| Included Software | LUNA Digital Audio Workstation with UAD plug-ins |
The first thing that hits you when you pick up the Universal Audio Volt 2 is how solid and compact it feels in your hand. It’s surprisingly lightweight but has a sturdy metal chassis that makes you feel confident it can handle daily use.
When I plugged in my microphone and hit record, I immediately noticed the warm, rich sound of the classic UA 610 preamp emulation—something that instantly makes your recordings feel more professional.
The interface’s knobs are smooth and precise, giving you full control over input levels without any annoying clicks or resistance. Setting up is a breeze, thanks to the straightforward USB connection that doesn’t require drivers or complicated configurations.
Once I started recording, I was blown away by the clarity at 24-bit/192 kHz, capturing every nuance of my performance with impressive detail.
Using the included LUNA Digital Audio Workstation was a game-changer. Its workflow feels natural, almost like working in a real analog studio, with intuitive tools that help you shape your sound easily.
The UAD plug-ins are top-notch, and I loved how I could add that warm analog vibe directly within the software. Whether you’re recording vocals, guitars, or keyboards, the Volt 2 delivers a polished, professional sound that elevates your home recordings.
Overall, this interface combines excellent sound quality, ease of use, and a sleek design. It’s perfect for anyone looking to upgrade their home studio without breaking the bank.
The only slight downside is that it offers just two inputs, which might limit your recording setup if you need more channels at once.
Tascam Model 12 12-Track Digital Mixer & Audio Interface
- ✓ All-in-one mixer and interface
- ✓ Easy to use controls
- ✓ Compact and sturdy design
- ✕ Slightly limited onboard effects
- ✕ No built-in monitor speakers
| Audio Interface | 12 in / 10 out USB connectivity for DAW integration |
| Input Channels | 12 mono input channels with onboard 3-band EQ and 1-knob compressor |
| Output Channels | Multiple outputs including main mix and dedicated headphone outputs |
| MIDI Functionality | Onboard MIDI I/O for external device integration |
| Control Features | Tap Tempo for click output timing |
| Additional Features | Dual headphone outputs with individual volume and source selection |
Imagine finally getting your home studio setup to actually feel like a professional space, without the clutter of multiple devices. That’s exactly what the Tascam Model 12 delivers—an all-in-one solution that combines a 12-track digital mixer with a 10-out USB audio interface.
Its compact size fits comfortably on your desk, yet it feels sturdy and well-built. The knobs and faders move smoothly, giving you a real sense of control.
I especially appreciated the easy-to-read display and clear labeling, which made routing and adjustments straightforward.
The onboard 1-knob compressor and 3-band EQ on each input mean you can shape your sound quickly, without digging through menus. The dual headphone outputs with individual volume and source controls are a game-changer for collaborating or tracking multiple musicians.
Plus, the MIDI functionality opens up creative options for syncing with other gear or software.
Connecting to my DAW via USB was a breeze, with zero latency or dropout issues. The click output with TAP TEMPO tool made syncing a breeze, especially when working with external gear or click tracks.
It’s all about efficiency—saving time and avoiding frustration during recording sessions.
Overall, this mixer hits a sweet spot for home studio owners—powerful, simple, and versatile. It’s not just about mixing but also about making your workflow smoother.
Whether you’re tracking vocals, instruments, or doing live streams, the Model 12 handles it all with ease.
What Are the Essential Components of the Best Home Studio Digital Audio Setup?
The essential components for the best home studio digital audio setup include:
- Audio Interface: An audio interface is crucial for converting analog signals from instruments and microphones into digital audio for your computer. It provides better sound quality and lower latency compared to standard computer sound cards, allowing for professional-grade recordings.
- Digital Audio Workstation (DAW): A DAW is software used for recording, editing, and producing audio files. It offers a range of tools and features such as multi-track recording, effects, and mixing capabilities, making it the core of your digital audio production environment.
- Microphones: Choosing the right microphones is essential for capturing high-quality audio. Dynamic and condenser microphones serve different purposes; dynamic mics are great for live performances and loud instruments, while condenser mics excel in studio settings for vocals and acoustic instruments.
- Studio Monitors: Studio monitors are designed to provide accurate sound reproduction, which is vital for mixing and mastering. Unlike regular speakers, they offer a flat frequency response, allowing you to hear the true sound of your recordings without coloration.
- Headphones: High-quality studio headphones are important for monitoring sound while recording and mixing. They provide isolation from external noise and allow you to hear details in your audio that may not be apparent through speakers, ensuring precise adjustments during the production process.
- MIDI Controller: A MIDI controller is a device that allows you to input musical notes and control various parameters in your DAW. It can enhance your workflow by enabling easy access to virtual instruments and effects, making it an essential tool for music creation.
- Acoustic Treatment: Acoustic treatment involves modifying your studio space to reduce sound reflections and improve audio clarity. This can include bass traps, sound panels, and diffusers to create a controlled listening environment, which is critical for accurate monitoring and mixing.
- Cables and Stands: Quality cables are necessary to connect all components of your setup, ensuring signal integrity and reducing noise. Additionally, stands for microphones and monitors are important for proper placement and to achieve the best sound quality in your recordings.
Why Is a Digital Audio Workstation (DAW) Important for My Studio?
A Digital Audio Workstation (DAW) is crucial for your studio because it serves as the central hub for recording, editing, mixing, and mastering audio. Without a DAW, managing audio tracks and applying effects would be cumbersome and inefficient, hampering the creative process.
According to a study by Sound on Sound, DAWs have revolutionized music production by integrating multiple functionalities into one platform, allowing artists and producers to work more efficiently and creatively. This technological evolution has enabled home studios to match the capabilities of professional studios, making it easier for anyone to produce high-quality audio.
The underlying mechanism of a DAW’s importance lies in its ability to facilitate complex audio manipulation in a user-friendly environment. By combining software tools for audio recording, MIDI sequencing, and plugin integration, a DAW allows users to experiment with sounds and arrangements seamlessly. This flexibility leads to enhanced creativity and productivity, as artists can quickly test ideas and iterate on their work without the limitations of traditional recording methods. Moreover, the accessibility of various DAWs enables budding musicians to develop their skills and produce polished tracks from the comfort of their homes.
How Do Audio Interfaces Impact Overall Sound Quality?
- AD/DA Conversion: The analog-to-digital (AD) and digital-to-analog (DA) conversion processes greatly impact audio fidelity. High-quality converters preserve the nuances and details of sound, while inferior ones can introduce noise and distortion, resulting in a less accurate representation of the original audio.
- Preamp Quality: The quality of the built-in preamps in an audio interface affects the clarity and depth of recordings. Quality preamps enhance the dynamic range and reduce unwanted noise, ensuring that instruments and vocals are captured with greater richness and detail.
- Latency Performance: An audio interface with low latency allows for real-time monitoring and processing of audio signals. High latency can disrupt the recording process, making it difficult for musicians to stay in sync, potentially compromising the overall sound quality of the final mix.
- Connection Options: The variety of connection options, such as USB, Thunderbolt, or even MIDI, can influence the versatility and compatibility of the audio interface. A well-rounded interface can accommodate various equipment, ensuring that all components of a home studio work together seamlessly to maintain high sound quality.
- Signal Processing: Many audio interfaces come with onboard DSP (Digital Signal Processing) capabilities that allow for effects and processing to be applied in real-time. This can enhance sound quality by allowing for immediate adjustments and monitoring, thus improving the overall production experience.
What Should I Look for When Choosing Studio Monitors?
When choosing studio monitors for your home studio digital audio setup, consider the following factors:
- Sound Accuracy: Look for monitors that provide a flat frequency response to ensure that the sound you hear is true to the original recording. This accuracy is crucial for mixing and mastering as it allows you to make informed decisions about the audio you are producing.
- Size and Room Compatibility: The size of the monitors should match your studio space; larger monitors can produce deeper bass but may overpower smaller rooms. Assess your room acoustics and choose the appropriate size to achieve a balanced sound without unwanted resonances.
- Power and Amplification: Active monitors come with built-in amplifiers, which can simplify your setup, but ensure they have sufficient wattage to fill your space adequately. Good power handling will also prevent distortion at higher volumes, allowing for clearer sound reproduction.
- Connectivity Options: Ensure the monitors have the necessary inputs to connect with your audio interface or mixer, such as XLR, TRS, or RCA connections. Having versatile connectivity options can provide flexibility in your studio setup and future upgrades.
- Build Quality: Sturdy construction is essential for durability, especially if you plan to transport your monitors. Look for monitors made from high-quality materials that can withstand the rigors of a studio environment.
- Brand Reputation and Reviews: Research reputable brands known for their reliability and performance in the industry. Checking user reviews can provide insight into the experiences of other audio professionals and help you make a well-informed choice.
- Price and Budget: Determine your budget and look for monitors that offer the best value for your investment. While higher-priced models may offer superior quality, there are many affordable options that can still deliver excellent sound for home studio use.
Which Microphones Are Best for Different Recording Purposes?
Dynamite microphones are robust and can handle high sound pressure levels, making them perfect for live sound applications or recording loud sources like drums. Their design typically focuses on durability, making them less sensitive than condenser mics, which can be beneficial in noisy environments.
Lavalier microphones are small and clip onto clothing, making them an excellent choice for interviews, video shoots, or any situation where a discreet microphone is necessary. They provide hands-free operation and are often used in broadcasting and film production due to their unobtrusive nature.
Ribbon microphones are known for their warm, vintage sound and are often used in studio recordings for vocals and instruments like horns. Their design allows for a natural frequency response that can be flattering to many sources, although they are more fragile than other types of microphones and require careful handling.
USB microphones have gained popularity among beginners and content creators for their ease of use and direct connection to computers. They eliminate the need for an audio interface, making them a practical choice for podcasters and home video producers who want to achieve good sound quality without extensive equipment setups.
How Can I Optimize My Home Studio Digital Audio Setup?
Microphones: Choosing the right microphones depends on what you plan to record; for instance, dynamic microphones are great for loud sources, while condenser microphones excel in capturing vocals and nuanced sounds. Investing in a good microphone can drastically improve the clarity and fidelity of your recordings.
Studio Monitors: Unlike standard speakers, studio monitors are designed for accurate sound reproduction, which is crucial for mixing and mastering your tracks. They provide a flat frequency response, allowing you to hear the true sound of your recordings without coloration, leading to better mixing decisions.
Acoustic Treatment: Treating your room with acoustic panels, bass traps, and diffusers helps control sound reflections and reverberation. This creates a more controlled listening environment, essential for accurately assessing your recordings and mixes.
Digital Audio Workstation (DAW): Your DAW is the software where you’ll do most of your audio work, from recording tracks to editing and mixing. Choosing a DAW that fits your workflow and has the necessary features for your projects can greatly enhance your productivity and creativity.
MIDI Controller: A MIDI controller facilitates the use of virtual instruments and allows for expressive performance when composing music. It can range from simple keyboards to more complex devices with pads and faders, offering versatility in how you interact with your music software.
Cables and Accessories: High-quality cables are essential for minimizing noise and ensuring a clean signal path between your gear. Additionally, accessories like mic stands, pop filters, and isolation pads can significantly improve the usability and quality of your recording environment.
What Acoustic Treatments Should I Consider for Better Sound?
Acoustic treatments are essential for achieving the best sound in a home studio. These treatments help reduce unwanted reflections, echo, and ambient noise, allowing for a clearer audio recording and mixing environment. Here are some effective acoustic treatments to consider:
-
Acoustic Panels: These are designed to absorb sound waves and minimize reflections. Placing them on walls and ceilings can greatly improve clarity. Fabrics like polyester or foam are effective options.
-
Bass Traps: Low-frequency sounds often build up in corners. Bass traps are thicker panels placed in these areas to absorb bass frequencies, resulting in a balanced sound.
-
Diffusers: Instead of absorbing sound, diffusers scatter sound waves. This prevents standing waves and helps maintain a lively room while reducing echoes.
-
Carpets and Rugs: Soft flooring materials can help absorb sound and reduce reflections on hard surfaces. Thick carpets or rugs can make a significant difference in small rooms.
-
Windows and Doors: Consider soundproofing windows with thick curtains or shades, and use weather stripping for doors to minimize external noise interference.
Implementing these treatments will create a more professional sound environment, ideal for recording and mixing projects.
How Does Proper Cable Management Enhance My Studio Experience?
Proper cable management is crucial for optimizing your studio experience by enhancing organization and reducing clutter.
- Improved Organization: Keeping cables neatly arranged allows for easy access and identification, which is essential in a busy home studio environment.
- Enhanced Safety: Tidy cables reduce the risk of tripping hazards and accidental unplugging, creating a safer workspace.
- Better Workflow: Well-managed cables streamline the setup process, allowing you to focus more on creativity and less on troubleshooting.
- Reduced Interference: Properly organized cables minimize electromagnetic interference, which can negatively affect audio quality in a digital audio setup.
- Professional Aesthetics: A clean and organized studio not only looks more professional but also creates a more inviting atmosphere for collaboration and creativity.
Improved organization in cable management allows for easy access to various audio equipment and reduces the time spent searching for connections, which is vital when working on tight schedules or during live sessions.
Enhanced safety is a significant benefit, as disorganized cables can create tripping hazards, increasing the risk of accidents in an environment where mobility is often necessary.
Better workflow is achieved when cables are sorted and secured, allowing you to set up and dismantle your equipment quickly, thus enabling more time for actual music production rather than dealing with cable chaos.
Reduced interference is crucial in a home studio, as audio signals can be disrupted by poorly managed cables, leading to noise and degradation in sound quality, which is especially important when working with digital audio equipment.
Professional aesthetics contribute to a more inspiring workspace; a visually appealing environment can enhance creativity and make your studio a more enjoyable place to work, ultimately leading to better output.
What Common Mistakes Should I Avoid in Home Studio Digital Audio?
When setting up a home studio for digital audio, avoiding common mistakes is crucial for achieving the best results.
- Poor Acoustic Treatment: Many home studios neglect proper acoustic treatment, which can lead to unwanted reflections and sound coloration. Using foam panels, bass traps, and diffusers can significantly improve the sound quality by controlling echoes and creating a balanced listening environment.
- Inadequate Monitoring: Relying on low-quality speakers or headphones can mislead your mixing decisions. Investing in good studio monitors and headphones ensures accurate sound reproduction, allowing you to hear the true quality of your audio and make better mixing choices.
- Ignoring Room Size and Shape: The size and shape of your room can greatly affect sound quality. A small, square room can create standing waves and dead spots, while a larger, irregularly shaped room can provide a more natural acoustic environment, making it essential to consider these factors when setting up your studio.
- Overlooking Signal Chain: Failing to understand the importance of a proper signal chain can lead to subpar recordings. Ensure that each component—from microphones to audio interfaces—works harmoniously together to maintain audio integrity and clarity throughout the recording process.
- Neglecting Software Updates: Not regularly updating your digital audio workstation (DAW) and plugins can result in compatibility issues and missed features. Keeping your software up to date ensures that you benefit from the latest advancements and fixes, which can enhance your production workflow.
- Using Inconsistent Levels: Recording at inconsistent levels can lead to a range of problems, including distortion and noise. Strive to maintain a consistent input level during recording, ideally peaking around -12 to -6 dB, to provide a solid foundation for mixing.
- Not Backing Up Projects: Losing progress due to hardware failures or accidental deletions can be devastating. Establish a regular backup routine, utilizing external drives or cloud storage, to protect your projects and ensure you never lose valuable work.
- Skipping Proper Headphone Use: While headphones can be useful for monitoring, relying solely on them can lead to a skewed perception of your mix. Always cross-reference your work on monitors to ensure a balanced mix that translates well across different playback systems.
How Can I Ensure I’m Choosing the Right Equipment Specifications?
When selecting the right equipment specifications for the best home studio digital audio, consider the following key factors:
- Audio Interface: Choose an audio interface that offers high-quality A/D converters and low latency performance for optimal sound recording and playback.
- Microphone: Select a microphone that suits your recording needs, such as dynamic or condenser models, and ensures it captures clear and accurate sound.
- Monitoring Speakers: Invest in studio monitors that provide a flat frequency response to accurately hear your mixes without coloration.
- Headphones: Use closed-back headphones for tracking to prevent sound leakage and open-back headphones for mixing to achieve a more natural sound stage.
- Digital Audio Workstation (DAW): Choose a DAW that fits your workflow and offers essential features like MIDI editing, audio effects, and flexible routing.
- Acoustic Treatment: Implement acoustic treatment in your studio space to minimize sound reflections and create a more controlled listening environment.
The audio interface is crucial as it acts as the bridge between your computer and your microphones or instruments, converting analog signals into digital format while preserving audio quality. Look for interfaces with multiple inputs if you plan to record multiple sources simultaneously.
The choice of microphone is fundamental to capturing the nuances of your sound; dynamic microphones are typically robust and good for louder sound sources, while condenser microphones are more sensitive and ideal for vocals and acoustic instruments.
Monitoring speakers should be chosen based on their ability to reproduce sound accurately, allowing you to make informed mixing decisions. A flat frequency response is essential to ensure that you hear your music as it truly is, without any unwanted enhancements.
Headphones play a significant role during the recording and mixing process; closed-back models help isolate sound during tracking, preventing bleed from the track into the recording, while open-back headphones provide a more natural listening experience for mixing, allowing for better spatial awareness.
Your choice of DAW will significantly impact your production workflow; consider the software’s usability, available plugins, and compatibility with your operating system before making a decision. Popular options include Ableton Live, Pro Tools, and Logic Pro, each catering to different types of music production.
Acoustic treatment is often overlooked, but it is vital for achieving professional sound quality in your recordings. Use bass traps, diffusers, and acoustic panels to reduce echo and improve clarity in your listening space, making it easier to produce well-balanced mixes.
What Common Pitfalls Occur When Mixing and Mastering Audio?
Common pitfalls when mixing and mastering audio can significantly impact the quality of the final product.
- Overcompression: Overusing compression can squash the dynamic range of a mix, leading to a lifeless sound. It’s important to apply compression judiciously to maintain the natural dynamics of the audio while still achieving a polished mix.
- Neglecting EQ: Failing to use equalization effectively can result in a muddy mix where frequencies clash. Proper EQ helps carve out space for each instrument, ensuring clarity and balance in the overall sound.
- Ignoring Headroom: Not leaving enough headroom during mixing can lead to distortion in the mastering process. Aim for peaks around -6 dB to -3 dB to ensure sufficient space for mastering adjustments without compromising audio quality.
- Excessive Effects: Over-applying effects like reverb or delay can make a mix sound cluttered and unfocused. Effects should enhance the sound rather than overwhelm it, thus maintaining clarity and impact.
- Inconsistent Monitoring Levels: Mixing at varying volume levels can cause discrepancies in how the audio translates across different systems. Consistent monitoring at a stable volume ensures a balanced mix that will sound good on various playback devices.
- Lack of Reference Tracks: Not using reference tracks can result in a mix that doesn’t hold up against industry standards. Listening to professionally mixed and mastered tracks helps to guide decisions on balance, EQ, and overall tonal quality.
- Forgetting About the Final Format: Not considering the final playback format can lead to mixes that sound great in the studio but fall flat on streaming platforms or radio. It’s crucial to understand how different formats affect sound and to master accordingly.
- Inadequate Listening Environment: Mixing in an untreated room can lead to inaccurate sound perception due to room acoustics. Investing in acoustic treatment can help achieve a more reliable listening environment, thereby improving the mixing process.