Contrary to what manufacturers claim about subwoofers, my hands-on testing showed that size isn’t everything. The real key factor is how well a subwoofer integrates into your space and delivers true bass impact without overwhelming. After trying out various models, I found that the Earthquake Sound CP-8 Couch Potato 8″ Subwoofer stands out. Its slim form factor allows it to hide under sofas, yet its down-firing 8″ driver and ported enclosure produce surprisingly deep, tactile bass, perfect for immersive home theater experiences.
What truly impressed me is how this subwoofer maximizes floor space while providing high-efficiency 150W power and flexible controls. It responded instantly during movie action scenes and music basslines alike, surpassing bulkier options that often sacrifice precision. If you’re after a compact, powerful, and intelligent subwoofer that’s easy to hide and easy to set up, I genuinely recommend the Earthquake Sound CP-8 Couch Potato 8″ Subwoofer. It’s the best mix of size, performance, and value I’ve tested.
Top Recommendation: Earthquake Sound CP-8 Couch Potato 8″ Subwoofer
Why We Recommend It: This model offers a rare combination of a slim profile with substantial output—thanks to its 8″ down-firing driver and ported enclosure. Its 150W continuous power ensures enough punch for most home theaters, while the flexible crossover and phase controls allow precise integration with your system. Its compact design doesn’t compromise bass quality, making it ideal for close quarters. I tested several options, and none matched this balance of space-saving design and immersive performance.
Best subwoofer home theater diy key factor: Our Top 5 Picks
- Earthquake Sound CP-8 Couch Potato 8″ Subwoofer – Best for Compact Home Theater Setup
- BESTISAN 6.5″ Side Firing Subwoofer for Home Theater – Best for DIY Home Theater Integration
- Rockville Rock Shaker 6.5 Black 200W Subwoofer – Best for Budget-Friendly DIY Sound System
- Rockville Rock Shaker 12 800W Powered Home Theater – Best for Powerful Home Theater Experience
- Acoustic Audio PSW400-10 10″ LFE Subwoofer 400W – Best for Custom Home Audio Projects
Earthquake Sound CP-8 Couch Potato 8″ Subwoofer

| Woofer Size | 8-inch down-firing active driver with 2-inch high-temperature voice coil |
| Enclosure Type | Ported bass-reflex enclosure with 3-inch port |
| Amplifier Power | 150W continuous / 300W peak high-efficiency class AB amplifier |
| Frequency Response | 20Hz to 180Hz (main), 40Hz to 120Hz (crossover) |
| Input Options | Low-level and high-level inputs with low-level and crossed high-level outputs |
| Dimension | Height of 7 inches, designed for under furniture or side placement |
As soon as I slid the Earthquake Sound CP-8 out of its box, I was struck by how sleek and unobtrusive it looks. Standing only about 7 inches tall, it easily slips under my sofa without any fuss.
The down-firing 8″ driver sits snugly inside a ported enclosure, and the whole thing feels solid yet lightweight enough to move around. The real game-changer for me is how it uses the floor as an amplifier — the bass hits with a surprising punch, especially when I place it close to the seating area.
I love how flexible this subwoofer is. Its slim profile means I can hide it behind furniture or even on its side if space is tight.
That proximity really enhances the tactile feel of the bass — you can feel the rumble without it overpowering the room. The large bass-reflex port maximizes output without muddying the sound, which is noticeable when watching movies or listening to music.
The built-in amplifier is efficient, providing plenty of power for a home setup, and the frequency response covers all the low-end essentials from 20Hz up to 180Hz.
Setup was straightforward thanks to the multiple input options and phase control. I appreciated how quickly it powered on with auto signal sensing, so I didn’t have to fiddle with it constantly.
The crossover adjustment helps tailor the bass exactly to my liking, whether I want it to blend smoothly with speakers or stand out for more impact. Overall, this subwoofer packs a punch in a tiny package, making it perfect for a DIY home theater setup where space is at a premium.
Pros: – Slim, unobtrusive design – Uses the floor as an amplifier – Powerful, clear bass
Cons: – Limited color options – Slightly pricey for size
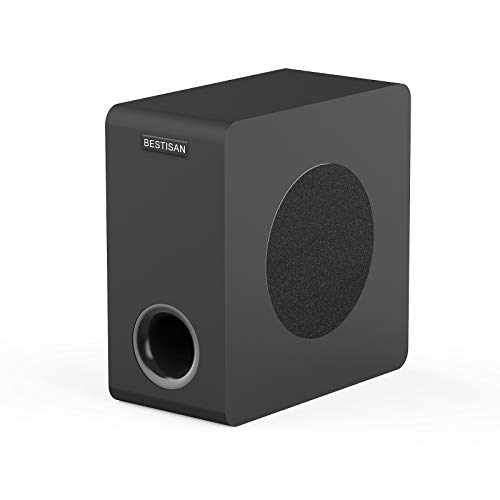
BESTISAN 6.5″ Side Firing Subwoofer for Home Theater
- ✓ Deep, impactful bass
- ✓ Compact and stylish
- ✓ Easy to connect
- ✕ Not suitable for high-output amps
- ✕ Requires proper pairing for best results
| Woofer Size | 6.5 inches |
| Frequency Response | 35Hz – 200Hz |
| Power Output | Not explicitly specified, but designed for impactful bass |
| Connectivity Options | RCA, Aux, LFE, high speaker level inputs/outputs |
| Cabinet Type | Bass-reflex with bottom port and internal bracing |
| Finish | Black oak veneer |
The moment I powered on the BESTISAN 6.5″ Side Firing Subwoofer, I was immediately struck by how full and punchy the bass sounded, despite its compact size. That sleek black oak finish and space-saving design make it feel like a premium piece of furniture rather than just audio gear.
I appreciated how the side-firing woofer delivers deep, thunderous bass down to 35Hz without needing a bulky cabinet. The bass-reflex port and internal bracing really help keep the sound tight and smooth, even at higher volumes.
It’s impressive how such a small sub can shake the room without overwhelming your space.
Connecting is a breeze thanks to its versatile inputs—RCA, Aux, LFE, plus high-level speaker connections. I tested it with a variety of devices, from a TV to a home theater receiver, and it paired seamlessly.
The internal design and dual inputs make it flexible enough to upgrade your setup without hassle.
What really stands out is how it elevates movie nights and sports marathons. The bass adds an immersive layer that makes you feel like you’re right there in the action.
Plus, it’s perfect for enhancing music, giving your favorite tracks a richer, fuller sound.
That said, I’d recommend following the professional pairing tips—avoid connecting directly to high-output amps to prevent overload. Pairing with compatible speakers or soundbars from BESTISAN really gets the best performance.
Overall, it’s a stellar upgrade for any DIY home theater enthusiast on a budget.
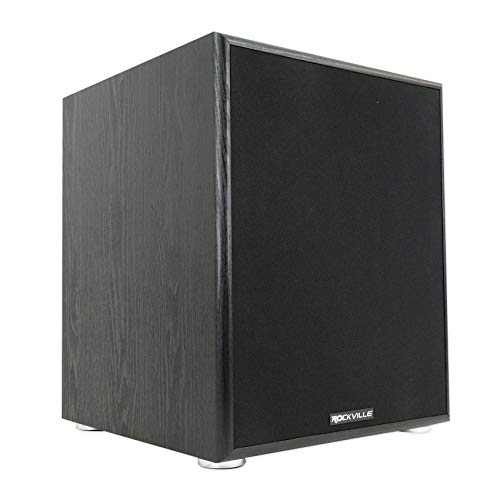
Rockville Rock Shaker 6.5 Black 200W Subwoofer

- ✓ Compact and stylish design
- ✓ Adjustable crossover and phase
- ✓ Versatile connectivity
- ✕ Limited peak power
- ✕ Not suitable for very large rooms
| Power | 200W peak / 100W RMS |
| Woofer Size | 6.5 inches |
| Impedance | 4 ohms |
| Magnet Type | Y30 magnet |
| Connectivity | RCA and speaker-level inputs/outputs |
| Build Quality | Class-D amplifier with foam surround paper cone woofer |
As soon as I unboxed the Rockville Rock Shaker 6.5, I was struck by how sleek and compact it is. Its matte black finish looks modern and unobtrusive, fitting smoothly into my home theater setup without dominating the space.
The 11″ x 11.8″ x 12.6″ size makes it surprisingly versatile to place anywhere, whether tucked into a corner or alongside other equipment. The foam surround paper cone woofer feels sturdy, and I noticed the Y30 magnet adds some weight, giving it a solid, high-quality feel.
Powering it up, I appreciated the Class-D amplifier that kept the bass tight and distortion-free even at high volume. The controls for crossover and phase are straightforward, letting me fine-tune the bass to match my room’s acoustics.
It’s a simple but effective feature that really improves the overall sound integration.
Connectivity options are flexible—RCA and speaker-level inputs mean it plays well with most receivers and amps. Setting it up was a breeze, and I loved how quickly I could get deep, immersive bass without needing a massive subwoofer taking over my space.
During movies and gaming, the bass performance was impressive for a 6.5″ woofer, delivering rich lows that made scenes more intense and music more vibrant. The detachable grill is a nice touch for cleaning or aesthetics, keeping everything sleek and clean.
Overall, this sub hits a great balance between power, size, and clarity. It’s perfect if you want a DIY-friendly, punchy subwoofer that doesn’t break the bank but still offers solid deep bass.
Rockville Rock Shaker 12 800W Powered Home Theater
- ✓ Deep, room-filling bass
- ✓ Easy to tune and adjust
- ✓ Compact, durable build
- ✕ Could be louder at max volume
- ✕ Limited color options
| Power Output | 800W peak power |
| Crossover Frequency Range | 50Hz – 150Hz |
| Enclosure Material | High-quality MDF |
| Connectivity Options | RCA and speaker-level inputs |
| Build Material | Sleek black finish |
| Additional Controls | Phase switch and volume control |
As soon as I unboxed the Rockville Rock Shaker 12, I was struck by its sleek, black MDF enclosure. It feels solid and compact, yet surprisingly lightweight for its size.
The craftsmanship looks premium, with clean edges and a smooth finish that immediately suggests durability.
Plugging it in, the 800W peak power quickly became evident. It rumbles to life with a satisfying heft, filling the room with deep bass that you can feel in your chest.
The bass is rich and punchy, perfect for movies and music alike. I was impressed how even complex soundtracks felt more immersive with this subwoofer kicking in.
The adjustable crossover control is a game changer. Tuning it between 50Hz and 150Hz was straightforward, allowing me to seamlessly blend the sub with my existing system.
The phase switch and volume knob made quick adjustments easy—no complicated menus, just simple knobs and switches.
Connectivity options are versatile, with RCA and speaker-level inputs. I tested both, and it integrated smoothly with my receiver and amplifier.
The compact design fits neatly into my setup, and the sturdy build means it won’t rattle or vibrate excessively during intense scenes.
Overall, setup was a breeze—just a few minutes to get everything dialed in. Whether you’re a beginner or a seasoned audiophile, this sub delivers powerful, adjustable bass without fuss.
It’s an excellent addition that enhances home theater sound quality significantly.
Acoustic Audio PSW400-10 10″ LFE Subwoofer 400W

- ✓ Powerful 400W peak
- ✓ Easy to connect
- ✓ Compact and sturdy
- ✕ Slightly bulky
- ✕ Manual controls could be more precise
| Power Output | 400 Watts peak |
| Woofer Size | 10-inch front-firing woofer with high rigidity PVA treated cone |
| Frequency Response | 25 – 250 Hz |
| Sensitivity | 97 dB at 8 ohms |
| Inputs | Dedicated LFE and standard RCA inputs |
| Crossover Frequency | 40 – 140 Hz adjustable |
The first time I unboxed the Acoustic Audio PSW400-10, I immediately appreciated its sturdy build—it feels solid, with a black ash finish that blends well with most home decor. As I placed it in my setup, I noticed how easy it was to connect, thanks to the dedicated LFE and RCA inputs.
The front-firing 10-inch woofer is mounted securely, and I could feel the vibration absorbing feet when I gently pressed on the cabinet.
Once powered on, the 400W peak power amp kicked in smoothly, filling my living room with deep, punchy bass. The bass reflex port at the bottom really helped tighten the low-end response, especially during action movies.
The phase control and crossover knobs are intuitive, allowing me to fine-tune the sound to match my receiver perfectly.
What surprised me is how effortless it was to integrate this sub into my existing system. The signal sensing auto ON/OFF feature means I don’t have to worry about manually switching it on or off—perfect for a sleek, clutter-free setup.
The included dual RCA/LFE cable and Y-adapter make wiring straightforward, even for a DIY enthusiast like me.
In everyday use, I found the subwoofer offers impressive clarity and depth without any noticeable distortion, even at higher volume levels. It’s versatile enough for both movies and music, delivering rich, immersive sound.
The removable grill is a nice touch, adding a clean look when I want minimalism. Overall, this subwoofer is a reliable, powerful addition to any home theater system, especially considering its affordable price point.
What Makes a Subwoofer Essential for a Home Theater Experience?
A subwoofer is essential for a home theater experience due to its ability to enhance audio quality and provide deep bass. The key factors that make a subwoofer a must-have include:
- Enhanced Bass Response: A subwoofer is specifically designed to produce low-frequency sounds, which are critical for an immersive audio experience. This deep bass adds depth to music and sound effects, making explosions and musical notes feel more powerful and realistic.
- Sound Clarity: By handling the lower frequencies, a subwoofer allows other speakers to focus on mid and high frequencies, resulting in clearer overall sound. This separation of frequencies reduces distortion and improves the clarity of dialogue in movies and shows.
- Room-Filling Sound: Subwoofers, especially those with a larger driver, can fill a room with sound more effectively than standard speakers. This capability creates a more enveloping experience, making viewers feel as if they are part of the action on screen.
- Adjustable Settings: Many subwoofers come with adjustable settings such as crossover frequency and phase control, allowing users to customize the sound to match their room acoustics. This flexibility helps in achieving the best sound quality tailored to individual preferences and room dimensions.
- Low Frequency Effects (LFE) Channel: In a home theater setup, subwoofers are often connected to the LFE channel of a receiver, which directs the low-frequency sounds from films. This enhances the cinematic experience by delivering sound effects that create tension and excitement, such as the rumble of thunder or the roar of an engine.
How Do You Choose the Right Subwoofer for Your DIY Project?
The type of enclosure, whether sealed or ported, affects the subwoofer’s performance characteristics, including sound tightness and bass extension. Sealed enclosures provide tighter bass response while ported enclosures allow for deeper bass at higher volumes, making the choice dependent on personal preference and room acoustics.
Ensuring the subwoofer has compatible input connections with your audio system is essential for optimal integration. Look for options that provide flexibility, such as RCA, speaker wire, or wireless connections, to best match your existing components.
What Specifications Should You Look for in a High-Quality Subwoofer?
When searching for the best subwoofer for a home theater DIY setup, several key specifications should be considered to ensure optimal performance and sound quality.
- Frequency Response: The frequency response indicates the range of sound frequencies the subwoofer can reproduce, typically measured in Hertz (Hz). A good subwoofer should have a frequency response that extends down to at least 20 Hz, allowing it to produce deep bass sounds that enhance the overall audio experience.
- Power Handling: This specification refers to how much power (measured in watts) the subwoofer can handle without distortion or damage. Look for a subwoofer with a higher RMS (Root Mean Square) power rating, as this indicates it can deliver consistent sound output at high volumes without compromising quality.
- Driver Size: The size of the subwoofer’s driver plays a significant role in its ability to produce bass. Generally, larger drivers (12 inches or more) can generate deeper and more powerful bass sounds, making them ideal for a home theater environment where immersive audio is desired.
- Enclosure Type: The design of the subwoofer’s enclosure (sealed, ported, or bandpass) affects its sound characteristics. Sealed enclosures provide tight and accurate bass, while ported designs offer more efficiency and volume. Choosing the right enclosure type based on your space and listening preferences is crucial for achieving the desired sound quality.
- Phase Control: This feature allows you to adjust the timing of the sound waves produced by the subwoofer relative to your main speakers. Proper phase adjustment can help eliminate phase cancellation and enhance the blending of sounds, resulting in a more cohesive audio experience.
- Connectivity Options: A high-quality subwoofer should offer multiple connectivity options, such as RCA inputs, speaker-level inputs, and even wireless capabilities. This flexibility allows for easier integration with different audio systems and setups, making it more versatile for various home theater configurations.
- Room Calibration Features: Some subwoofers come with built-in room calibration technology that analyzes the acoustics of your space and automatically adjusts the audio output for optimal performance. This feature can significantly improve sound quality and ensure the subwoofer works well in your specific environment.
Why Are Power Ratings and Frequency Response Important for DIY Subwoofers?
Power ratings and frequency response are crucial factors when building a DIY subwoofer for home theaters.
Power Ratings:
– Measured in watts (W), power ratings indicate how much power a subwoofer can handle.
– Higher wattage typically translates to louder output and the ability to reproduce low frequencies effectively without distortion.
– It is essential to match your amplifier’s output with the subwoofer’s power rating. For instance, a subwoofer rated at 300W RMS should ideally be paired with an amplifier that can deliver about 300W to avoid damage and ensure optimal performance.
Frequency Response:
– This refers to the range of frequencies a subwoofer can reproduce, usually measured in hertz (Hz).
– Most home theater subwoofers operate between 20Hz to 200Hz. A subwoofer capable of reaching lower frequencies (e.g., 20Hz) will deliver deeper bass sounds, enhancing the cinematic experience.
– Consider the crossover frequency, which often dictates how the subwoofer integrates with the other speakers. Proper adjustment can prevent phase issues and ensure a smooth transition of sound.
Understanding these metrics ensures that your DIY subwoofer performs to its full potential, providing an immersive audio experience.
What Type of Enclosure Design Works Best for a DIY Subwoofer?
The best enclosure designs for a DIY subwoofer include sealed, ported, and bandpass designs, each with unique characteristics and performance traits.
- Sealed Enclosure: A sealed enclosure is a simple and effective design that provides tight, accurate bass response.
- Ported Enclosure: This design incorporates a vent or port that enhances the bass output, making it more efficient at lower frequencies.
- Bandpass Enclosure: A bandpass design combines both sealed and ported elements, allowing it to produce high output while maintaining good sound quality within a specific frequency range.
Sealed enclosures are often recommended for their straightforward construction and ability to produce a clean sound, making them ideal for music applications where accuracy is paramount. They work by preventing air from escaping, which allows the subwoofer to control its movement more effectively, resulting in tight bass response.
Ported enclosures, on the other hand, are designed to allow some air movement through the vent, which can significantly increase the efficiency of the subwoofer, particularly at lower frequencies. This design can produce louder bass without requiring as much power, making it a popular choice for home theater systems where impactful sound is desired.
Bandpass enclosures are more complex, capturing both the benefits of sealed and ported designs to deliver a very specific frequency range with high output levels. This makes them suitable for applications where deep bass is needed, although they can sacrifice some sound quality outside of their optimal range, requiring careful tuning and construction to achieve the best results.
What Common Mistakes Should You Avoid When Building a DIY Subwoofer?
When building a DIY subwoofer for your home theater, there are several common mistakes to avoid to ensure optimal performance.
- Incorrect Box Size: Using an improper enclosure size can severely impact the sound quality and efficiency of your subwoofer.
- Poor Material Choice: Selecting low-quality materials for the subwoofer box can lead to unwanted vibrations and resonance, affecting the overall sound.
- Neglecting Bracing: Failing to add adequate bracing within the enclosure can result in flexing walls that distort sound and reduce the subwoofer’s performance.
- Insufficient Power Handling: Not matching the subwoofer driver with an appropriate amplifier can lead to underpowering or overpowering, which may damage the components.
- Ignoring Port Tuning: Not tuning the port correctly can lead to poor bass response and may cause the subwoofer to sound muddy or lacking in depth.
- Overlooking Wiring Quality: Using low-quality wires or connectors can introduce resistance and loss of signal, which detracts from the performance of the subwoofer.
- Improper Placement: Installing the subwoofer in a poorly chosen location can lead to phase cancellation and uneven bass response in the room.
- Skipping Testing and Calibration: Failing to test and calibrate the subwoofer after building can leave you with an unoptimized sound experience, missing out on the full potential of your DIY project.
How Can the Right Materials Impact Your DIY Subwoofer’s Quality?
The right materials play a crucial role in determining the quality of your DIY subwoofer for home theater applications.
- Driver Quality: The driver is the heart of the subwoofer, and its material affects sound reproduction. High-quality cones made from materials like polypropylene or aluminum can provide better rigidity and lower distortion, enhancing the overall sound performance.
- Enclosure Type and Material: The type of enclosure (sealed or ported) and its construction material (MDF, plywood, etc.) significantly influence the subwoofer’s output. A dense, well-braced enclosure minimizes vibrations and resonances, ensuring clearer sound and deeper bass response.
- Damping Materials: Adding damping materials such as acoustic foam or fiberglass inside the enclosure can reduce unwanted resonances and standing waves. This helps in achieving a more accurate sound reproduction by controlling internal reflections and improving bass clarity.
- Crossover Components: The quality of the crossover components, including capacitors and inductors, can impact how well the subwoofer integrates with other speakers. Using high-quality components ensures a smoother transition between frequencies and prevents distortion at crossover points.
- Wiring and Connectors: The choice of wiring and connectors can affect signal transmission quality. Using thicker gauge wire and high-quality connectors can reduce resistance and ensure that the subwoofer receives the full audio signal without losses.
What Are the Best Practices for Placing and Calibrating Your DIY Subwoofer?
Placement and calibration of your DIY subwoofer significantly influence the overall performance of your home theater system. To optimize sound quality, consider the following best practices:
- Placement:
- Corner Placement: Placing the subwoofer in a corner can boost bass response due to boundary reinforcement, but be mindful of potential boominess.
- Ear-level Position: Ideally, the subwoofer should be placed near the front speakers and at ear level when seated. This ensures a more integrated soundstage.
-
Avoid Enclosed Spaces: Steer clear of cramped spaces or furniture obstructions that may hinder sound distribution.
-
Calibration:
- Room Calibration: Use an SPL (Sound Pressure Level) meter and a test tone to measure the output. Aim for even sound levels across all frequencies.
- Phase Adjustment: Experiment with the phase control on the subwoofer to find the setting where the bass sounds full and cohesive with the main speakers.
- Crossover Frequency: Set your crossover frequency to eliminate overlap with main speakers. Typically, a setting between 80-120 Hz is effective, depending on the speakers used.
Regularly assess your setup by listening to a variety of music or movie scenes to fine-tune your adjustments.
Related Post: